Learn how to build agentic workflows with LangChain and LangGraph.
Introduction
This is the second article in our series on building intelligent agents with LangChain and LangGraph. In Part 1, we explored the fundamental concepts of connecting language models to tools. Now we'll take the next step: building sophisticated agentic workflows that can orchestrate multiple tools, maintain conversation state, and handle complex multi-step tasks.
While Part 1 focused on simple tool calling, real-world applications require systems that can:
- Plan and reason through multi-step problems
- Maintain context across conversations and tool interactions
- Handle interruptions and human feedback loops
- Orchestrate workflows with conditional logic and branching
In the following, we'll build an agen that feels truly intelligent - systems that don't just execute single commands, but can engage in meaningful dialogues while taking actions in the real world.
Let's dive into the world of agentic workflows and see how LangGraph makes building these sophisticated systems both intuitive and powerful.
Setting Up Our Environment
We'll build on the foundation from Part 1 while introducing new concepts for workflow orchestration:
StateGraph
: The core abstraction for building multi-step workflowsMessagesState
: LangGraph's built-in state for conversation handlingInMemorySaver
: For maintaining conversation history and checkpointsCommand
&interrupt
: For human-in-the-loop interactionscreate_react_agent
: A pre-built agent pattern for common use cases
These tools will allow us to create sophisticated agents that can handle complex, multi-turn conversations while maintaining context and state.
1from langchain.chat_models import init_chat_model
2from langchain.tools import tool
3from langgraph.graph import StateGraph, START, END, MessagesState
4from langgraph.checkpoint.memory import InMemorySaver
5from langgraph.prebuilt import create_react_agent
6from langgraph.types import Command, interrupt
7from typing import TypedDict, Literal
8from typing_extensions import TypedDict
9from rich.markdown import Markdown
10from pprint import pprint
11from IPython.display import Image
12import json
Recap: Building Blocks from Part 1
Let's quickly set up the foundational components we established in Part 1 - our language model and reply tool. These will serve as the building blocks for our more sophisticated workflows.
1llm = init_chat_model("google_vertexai:gemini-2.0-flash", temperature=0)
2
3
4@tool
5def draft_customer_reply(customer_name: str, request_category: str, reply: str) -> str:
6 """Draft a reply to a customer."""
7 return f"I am drafting a reply to {customer_name} in the category {request_category}.\n Content: {reply}"
8
9
10model_with_tools = llm.bind_tools(
11 [draft_customer_reply], tool_choice="any", parallel_tool_calls=False
12)
Introduction to Agentic Workflows
Now we move beyond simple tool calling to create agentic workflows - systems that can orchestrate multiple steps, maintain state, and make decisions about what to do next.
The key difference is structure and orchestration:
- Part 1: Direct tool calling (human → model → tool → response)
- Part 2: Workflow orchestration (human → workflow → multiple steps → response)
Defining Workflow State
LangGraph's StateGraph
is the foundation that makes this possible, allowing us to define how data flows between different processing steps.
Every agentic workflow needs a way to pass data between steps. LangGraph uses TypedDict
schemas to define what information flows through your system.
Our simple schema captures:
request
: A user requestreply
: The final result from our tool
This state acts as the "memory" of our workflow, ensuring each step has access to the information it needs.
1class StateSchema(TypedDict):
2 request: str
3 reply: str
1class StateSchema(TypedDict):
2 request: str
3 reply: str
1def reply_tool_node(state: StateSchema) -> StateSchema:
2 output = model_with_tools.invoke(state["request"])
3 args = output.tool_calls[0]["args"]
4 reply_msg = draft_customer_reply.invoke(args)
5 return {"reply": reply_msg}
1def reply_tool_node(state: StateSchema) -> StateSchema:
2 output = model_with_tools.invoke(state["request"])
3 args = output.tool_calls[0]["args"]
4 reply_msg = draft_customer_reply.invoke(args)
5 return {"reply": reply_msg}
Creating Workflow Nodes
Nodes are the processing units of your workflow. Each node is a function that:
- Receives the current state
- Performs some computation or action
- Returns updates to merge back into the state
Our reply_tool_node
demonstrates the pattern: it takes the user's request, uses our model to generate a tool call, executes the tool, and returns the result.
1# init workflow
2workflow = StateGraph(StateSchema)
3
4# nodes
5workflow.add_node("reply_tool_node", reply_tool_node)
6
7# edges
8workflow.add_edge(START, "reply_tool_node")
9workflow.add_edge("reply_tool_node", END)
10
11# full workflow
12app = workflow.compile()
1# init workflow
2workflow = StateGraph(StateSchema)
3
4# nodes
5workflow.add_node("reply_tool_node", reply_tool_node)
6
7# edges
8workflow.add_edge(START, "reply_tool_node")
9workflow.add_edge("reply_tool_node", END)
10
11# full workflow
12app = workflow.compile()
Building the Workflow Graph
Now we assemble our workflow by defining the flow between nodes:
- Initialize the StateGraph with our schema
- Add nodes that process the data
- Add edges that define the execution flow
- Compile into an executable application
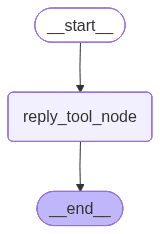
This creates a clear, visual representation of how our agent processes requests - from start to finish.
1app.invoke({"request": "This is about Franks order. Tell him it's 2 days late."})
{'request': "This is about Franks order. Tell him it's 2 days late.", 'reply': 'I am drafting a reply to Frank in the category order status.\n Content: Your order is 2 days late.'}
Testing Our First Agentic Workflow
Let's see our workflow in action. Notice how the request flows through our defined structure, and the state accumulates information as it progresses through each step.
Visualizing the Workflow
LangGraph automatically generates visual representations of your workflows. This helps you understand and debug complex agent behaviors by seeing exactly how data flows through your system.
1Image(app.get_graph().draw_mermaid_png())
Advanced Workflow Patterns
While our first example was linear, real agentic systems need conditional logic, loops, and decision points. Let's build a more sophisticated workflow that can handle different types of responses from the language model.
Building a Conversational Agent
This workflow introduces several sophisticated concepts:
MessagesState
: LangGraph's built-in state for handling conversations- Conditional edges: Logic that determines which node to execute next
- Tool message handling: Proper formatting of tool responses for the model
- Conversation loops: The ability to continue dialogues naturally
The should_continue
function demonstrates conditional routing - a key pattern in agentic systems where the workflow's next step depends on the current state.
1def call_llm(state: MessagesState) -> MessagesState:
2 """Run LLM"""
3 # Call the language model with the current messages in the state
4 output = model_with_tools.invoke(state["messages"])
5 # Return the output as a new messages list in the state
6 return {"messages": [output]}
7
8
9def run_tool(state: MessagesState):
10 """Performs the tool call"""
11 # Initialize a list to store tool responses
12 result = []
13 # Iterate over all tool calls in the last message
14 for tool_call in state["messages"][-1].tool_calls:
15 # Invoke the tool with the provided arguments
16 observation = draft_customer_reply.invoke(tool_call["args"])
17 # Append the tool's response in the required format
18 result.append(
19 {"role": "tool", "content": observation, "tool_call_id": tool_call["id"]}
20 )
21 # Return the tool responses as the new messages in the state
22 return {"messages": result}
23
24
25def should_continue(state: MessagesState) -> Literal["run_tool", "__end__"]:
26 """Route to tool handler, or end if Done tool called"""
27 # Get the list of messages from the state
28 messages = state["messages"]
29 # Get the last message in the conversation
30 last_message = messages[-1]
31
32 # If the last message contains tool calls, continue to the tool handler
33 if last_message.tool_calls:
34 return "run_tool"
35 # Otherwise, end the workflow (reply to the user)
36 return END
37
38
39# Initialize the workflow graph with the MessagesState schema
40workflow = StateGraph(MessagesState)
41
42# Add the node that calls the LLM
43workflow.add_node("call_llm", call_llm)
44# Add the node that runs the tool
45workflow.add_node("run_tool", run_tool)
46
47# Add an edge from the start node to the call_llm node
48workflow.add_edge(START, "call_llm")
49# Add conditional edges from call_llm node based on should_continue function
50workflow.add_conditional_edges(
51 # The node to branch from
52 "call_llm",
53 # The function that determines which edge to take next
54 should_continue,
55 # Mapping of possible return values to the next node
56 {
57 "run_tool": "run_tool", # If should_continue returns "run_tool", go to run_tool node
58 END: END, # If should_continue returns END, end the workflow
59 },
60)
61# Add an edge from run_tool node to the end node
62workflow.add_edge("run_tool", END)
63
64# Compile the workflow into an executable application
65app = workflow.compile()
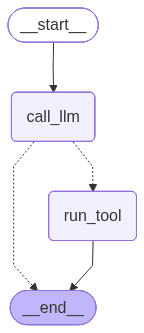
Visualizing Complex Workflows
This graph shows the conditional logic in action. Notice how call_llm
can either end the conversation or route to run_tool
, depending on whether tool calls are present in the response.
1Image(app.get_graph().draw_mermaid_png())
Testing the Conversational Agent
Watch how our agent processes the request:
- Receives the human message
- Generates a tool call with appropriate parameters
- Executes the tool
- Returns the formatted result
This demonstrates the complete agent lifecycle in a production-ready pattern.
1result = app.invoke(
2 {
3 "messages": [
4 {
5 "role": "user",
6 # content is the user's request
7 "content": "Let Frank know that his refund has been processed.",
8 },
9 ]
10 }
11)
12for m in result["messages"]:
13 m.pretty_print()
1result = app.invoke(
2 {
3 "messages": [
4 {
5 "role": "user",
6 # content is the user's request
7 "content": "Let Frank know that his refund has been processed.",
8 },
9 ]
10 }
11)
12for m in result["messages"]:
13 m.pretty_print()
================================[1m Human Message [0m================================= Let Frank know that his refund has been processed. ==================================[1m Ai Message [0m================================== Tool Calls: draft_customer_reply (71499a94-92c9-45f9-a868-ac4982c7b5f8) Call ID: 71499a94-92c9-45f9-a868-ac4982c7b5f8 Args: customer_name: Frank reply: Your refund has been processed. request_category: Refund =================================[1m Tool Message [0m================================= I am drafting a reply to Frank in the category Refund. Content: Your refund has been processed.
Memory and Conversation Threads
One of the most powerful features of agentic workflows is the ability to maintain context across multiple interactions. This is where memory and conversation threads become essential.
Real applications need agents that can:
- Remember previous interactions
- Build context over time
- Handle interruptions and human feedback loops
- Maintain separate conversation contexts for different users
Understanding Memory and Threads
Memory (Checkpointer): Stores the complete state history of your workflow, allowing agents to "remember" previous interactions and build context over time.
Thread: A unique identifier that groups related conversations together. Different threads maintain separate conversation histories, enabling multi-user applications.
The combination enables sophisticated behaviors:
- Contextual responses based on conversation history
- Resuming interrupted conversations
- Personalization across multiple interactions
Using Pre-Built Agent Patterns
The create_react_agent
function is a utility provided by LangGraph for building conversational agents that can reason and act using tools. It implements the ReAct (Reasoning + Acting) pattern, allowing your agent to alternate between thinking and taking actions (like calling tools) until the task is complete.
With create_react_agent
, you can:
- Define which tools your agent can use
- Provide a language model for reasoning
- Supply a prompt to guide the agent's behavior
- Optionally add memory (via a checkpointer) to enable multi-turn conversations
This function abstracts away much of the boilerplate, letting you focus on your agent's logic and capabilities.
The ReAct (Reasoning + Acting) pattern alternates between reasoning about what to do and taking actions until the task is complete.
I intentionally sent a nonsensical request to showcase how the agent handles unexpected or unclear inputs.
1agent = create_react_agent(
2 model=llm,
3 tools=[draft_customer_reply],
4 prompt="Respond to the user's request using the tools provided.",
5 checkpointer=InMemorySaver(),
6)
7
8config = {"configurable": {"thread_id": "1"}}
9result = agent.invoke(
10 {
11 "messages": [
12 {
13 "role": "user",
14 "content": "Why are lemons yellow?",
15 }
16 ]
17 },
18 config,
19)
1config = {"configurable": {"thread_id": "1"}}
2state = agent.get_state(config)
3for message in state.values["messages"]:
4 message.pretty_print()
1config = {"configurable": {"thread_id": "1"}}
2state = agent.get_state(config)
3for message in state.values["messages"]:
4 message.pretty_print()
================================[1m Human Message [0m================================= Why are lemons yellow? ==================================[1m Ai Message [0m================================== I am sorry, I cannot fulfill this request. The available tools lack the ability to provide an explanation for why lemons are yellow.
Accessing Conversation History
The get_state()
method allows you to inspect the complete conversation history for any thread. This is invaluable for debugging, analytics, and understanding how your agent behaves over time.
1# Continue the conversation
2result = agent.invoke(
3 {
4 "messages": [
5 {
6 "role": "user",
7 "content": "Inform Jon about his delivery status being in-progres.",
8 }
9 ]
10 },
11 config,
12)
13for m in result["messages"]:
14 m.pretty_print()
1# Continue the conversation
2result = agent.invoke(
3 {
4 "messages": [
5 {
6 "role": "user",
7 "content": "Inform Jon about his delivery status being in-progres.",
8 }
9 ]
10 },
11 config,
12)
13for m in result["messages"]:
14 m.pretty_print()
================================[1m Human Message [0m================================= Why are lemons yellow? ==================================[1m Ai Message [0m================================== I am sorry, I cannot fulfill this request. The available tools lack the ability to provide an explanation for why lemons are yellow. ================================[1m Human Message [0m================================= Inform Jon about his delivery status being in-progres. ==================================[1m Ai Message [0m================================== I am sorry, I cannot fulfill this request. The available tools lack the ability to inform Jon about his delivery status. I can only draft a reply to a customer.
Continuing Conversations
By using the same thread ID, our agent maintains context from previous interactions. Notice how it remembers the earlier question and can reference it in subsequent responses.
Watch how the conversation builds naturally. Each exchange adds to the shared context, enabling more sophisticated interactions that feel human-like in their continuity and understanding.
1# Continue the conversation
2result = agent.invoke(
3 {
4 "messages": [
5 {
6 "role": "user",
7 "content": "Let him know that it's specifically 15 min out.",
8 }
9 ]
10 },
11 config,
12)
13for m in result["messages"]:
14 m.pretty_print()
1# Continue the conversation
2result = agent.invoke(
3 {
4 "messages": [
5 {
6 "role": "user",
7 "content": "Let him know that it's specifically 15 min out.",
8 }
9 ]
10 },
11 config,
12)
13for m in result["messages"]:
14 m.pretty_print()
================================[1m Human Message [0m================================= Why are lemons yellow? ==================================[1m Ai Message [0m================================== I am sorry, I cannot fulfill this request. The available tools lack the ability to provide an explanation for why lemons are yellow. ================================[1m Human Message [0m================================= Inform Jon about his delivery status being in-progres. ==================================[1m Ai Message [0m================================== I am sorry, I cannot fulfill this request. The available tools lack the ability to inform Jon about his delivery status. I can only draft a reply to a customer. ================================[1m Human Message [0m================================= Let him know that it's specifically 15 min out. ==================================[1m Ai Message [0m================================== I am sorry, I cannot fulfill this request. The available tools lack the ability to inform Jon about his delivery status. I can only draft a reply to a customer and I do not have the functionality to access delivery status.
The impressive part is that the LLM understands "him" refers to Jon, thanks to the maintained conversational context.
Human-in-the-Loop: Interrupts and Feedback
The most sophisticated agentic systems know when to pause and ask for human guidance. Interrupts enable human-in-the-loop workflows where agents can:
- Request clarification on ambiguous tasks
- Ask for approval before taking critical actions
- Gather additional input to complete complex requests
- Handle scenarios outside their training or capabilities
This creates truly collaborative AI systems that combine automated efficiency with human judgment.
Building an Interrupt-Enabled Workflow
This example demonstrates the interrupt pattern:
- Normal processing: Nodes execute automatically in sequence
- Interrupt point: The workflow pauses and waits for human input
- Resume with feedback: The workflow continues with the provided information
- Completion: Normal processing resumes to finish the task
The interrupt()
function is the key - it suspends execution and requests human input.
1class State(TypedDict):
2 input: str
3 user_feedback: str
4
5
6def step_1(state):
7 print("---Step 1---")
8 pass
9
10
11def human_feedback(state):
12 print("---human_feedback---")
13 feedback = interrupt("Please provide input:")
14 return {"user_feedback": feedback}
15
16
17def step_3(state):
18 print("---Step 3---")
19 pass
20
21
22builder = StateGraph(State)
23builder.add_node("step_1", step_1)
24builder.add_node("human_feedback", human_feedback)
25builder.add_node("step_3", step_3)
26builder.add_edge(START, "step_1")
27builder.add_edge("step_1", "human_feedback")
28builder.add_edge("human_feedback", "step_3")
29builder.add_edge("step_3", END)
30
31# Set up memory
32memory = InMemorySaver()
33
34# Add
35graph = builder.compile(checkpointer=memory)
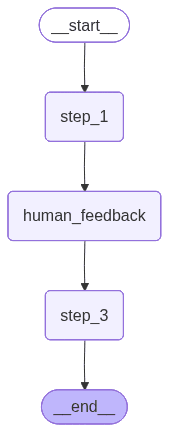
Visualizing Interrupt Workflows
The workflow graph shows the human feedback node as a regular step in the process. LangGraph handles the complexity of pausing execution and resuming when input arrives.
1Image(graph.get_graph().draw_mermaid_png())
Running the Interrupt Workflow
Notice how the workflow executes until it hits the interrupt point, then waits. The __interrupt__
event indicates the system is paused and waiting for human input.
1# Input
2initial_input = {"input": "hello world"}
3
4# Thread
5thread = {"configurable": {"thread_id": "1"}}
6
7# Run the graph until the first interruption
8for event in graph.stream(initial_input, thread, stream_mode="updates"):
9 print(event)
10 print("\n")
1# Input
2initial_input = {"input": "hello world"}
3
4# Thread
5thread = {"configurable": {"thread_id": "1"}}
6
7# Run the graph until the first interruption
8for event in graph.stream(initial_input, thread, stream_mode="updates"):
9 print(event)
10 print("\n")
---Step 1--- {'step_1': None} ---human_feedback--- {'__interrupt__': (Interrupt(value='Please provide input:', id='551b06d83c6f2292dabdbcdff897147f'),)}
Resuming with Human Feedback
Using the Command(resume=...)
function, we provide the requested feedback and continue execution. The workflow seamlessly incorporates the human input and proceeds to completion.
This pattern enables sophisticated collaborative workflows where AI handles routine tasks while humans provide guidance on complex decisions.
1# Continue the graph execution
2for event in graph.stream(
3 Command(resume="go to step 3!"),
4 thread,
5 stream_mode="updates",
6):
7 print(event)
8 print("\n")
1# Continue the graph execution
2for event in graph.stream(
3 Command(resume="go to step 3!"),
4 thread,
5 stream_mode="updates",
6):
7 print(event)
8 print("\n")
---human_feedback--- {'human_feedback': {'user_feedback': 'go to step 3!'}} ---Step 3--- {'step_3': None}
Reply Agent Implementation
Let's combine everything we've learned into a simple reply agent that demonstrates all the key concepts:
- Workflow orchestration with conditional logic
- Tool integration with proper error handling
- Clean architecture for maintainability
- Extensible design for adding more tools and capabilities
This serves as a template for building real-world agentic systems.
1# reply_agent.py
2from typing import Literal
3from langchain.chat_models import init_chat_model
4from langchain.tools import tool
5from langgraph.graph import MessagesState, StateGraph, END, START
6
7
8@tool
9def draft_customer_reply(customer_name: str, request_category: str, reply: str) -> str:
10 """Draft a reply to a customer."""
11 return f"I am drafting a reply to {customer_name} in the category {request_category}.\n Content: {reply}"
12
13
14llm = init_chat_model("google_vertexai:gemini-2.0-flash", temperature=0)
15model_with_tools = llm.bind_tools([draft_customer_reply], tool_choice="any")
16
17
18def call_llm(state: MessagesState) -> MessagesState:
19 """Run LLM"""
20
21 output = model_with_tools.invoke(state["messages"])
22 return {"messages": [output]}
23
24
25def run_tool(state: MessagesState) -> MessagesState:
26 """Performs the tool call"""
27
28 result = []
29 for tool_call in state["messages"][-1].tool_calls:
30 observation = draft_customer_reply.invoke(tool_call["args"])
31 result.append(
32 {"role": "tool", "content": observation, "tool_call_id": tool_call["id"]}
33 )
34 return {"messages": result}
35
36
37def should_continue(state: MessagesState) -> Literal["run_tool", "__end__"]:
38 """Route to tool handler, or end if Done tool called"""
39
40 # Get the last message
41 messages = state["messages"]
42 last_message = messages[-1]
43
44 # If the last message is a tool call, check if it's a Done tool call
45 if last_message.tool_calls:
46 return "run_tool"
47 # Otherwise, we stop (reply to the user)
48 return END
49
50
51# Create the workflow
52workflow = StateGraph(MessagesState)
53
54# Nodes
55workflow.add_node("call_llm", call_llm)
56workflow.add_node("run_tool", run_tool)
57
58# Edges
59workflow.add_edge(START, "call_llm")
60workflow.add_conditional_edges(
61 "call_llm", should_continue, {"run_tool": "run_tool", END: END}
62)
63workflow.add_edge("run_tool", END)
64
65# Compile the workflow
66app = workflow.compile()
Running Your Production Agent
To deploy this agent, save the code above as reply_agent.py
and run it from your terminal:
1python reply_agent.py
The agent will process your request through the complete workflow, demonstrating how all the concepts work together in a real application.
Example Usage and Output
Here's what happens when you run the agent:
Input: "Inform Jeremy about his delivery status being in-progres"
Processing:
- LLM analyzes the request
- Determines appropriate tool and parameters
- Executes the reply tool
- Returns formatted result
Output: Complete reply with correct classification
1# Demonstration of the complete workflow
2result = app.invoke(
3 {
4 "messages": [
5 {
6 "role": "user",
7 "content": "Inform Jeremy about his delivery status being in-progres.",
8 }
9 ]
10 }
11)
12
13print("=== Agent Workflow Result ===")
14for message in result["messages"]:
15 message.pretty_print()
=== Agent Workflow Result === ================================[1m Human Message [0m================================= Inform Jeremy about his delivery status being in-progres. ==================================[1m Ai Message [0m================================== Tool Calls: draft_customer_reply (fbbe25c4-c246-4b8f-86cd-9a20cf7e459b) Call ID: fbbe25c4-c246-4b8f-86cd-9a20cf7e459b Args: customer_name: Jeremy reply: Your delivery is in progress. request_category: Delivery Status =================================[1m Tool Message [0m================================= I am drafting a reply to Jeremy in the category Delivery Status. Content: Your delivery is in progress.
Key Takeaways and Next Steps
You've now mastered the essential concepts for building sophisticated agentic workflows:
Core Concepts Mastered:
- StateGraph orchestration: Managing complex multi-step workflows
- Conditional routing: Making decisions about workflow execution
- Memory and threads: Maintaining context across conversations
- Human-in-the-loop: Incorporating human feedback and oversight
- Production patterns: Building maintainable, extensible agent systems
Architectural Patterns Learned:
- State management with
TypedDict
schemas - Node-based workflow design
- Tool integration and error handling
- Conversation state persistence
- Interrupt-driven human collaboration
The patterns you've learned form the foundation for any intelligent agent system. Whether you're building customer service bots, data analysis tools, or autonomous workflow systems, these concepts will serve as your building blocks.

About the author: Michael Brenndoerfer
All opinions expressed here are my own and do not reflect the views of my employer.
Michael currently works as an Associate Director of Data Science at EQT Partners in Singapore, where he drives AI and data initiatives across private capital investments.
With over a decade of experience spanning private equity, management consulting, and software engineering, he specializes in building and scaling analytics capabilities from the ground up. He has published research in leading AI conferences and holds expertise in machine learning, natural language processing, and value creation through data.
Related Content

The Mathematics Behind LLM Fine-Tuning: A Beginner's Guide to how and why finetuning works
Understand the mathematical foundations of LLM fine-tuning with clear explanations and minimal prerequisites. Learn how gradient descent, weight updates, and Transformer architectures work together to adapt pre-trained models to new tasks.

Adapating LLMs: Off-the-Shelf vs. Context Injection vs. Fine-Tuning — When and Why
A comprehensive guide to choosing the right approach for your LLM project: using pre-trained models as-is, enhancing them with context injection and RAG, or specializing them through fine-tuning. Learn the trade-offs, costs, and when each method works best.

Building Intelligent Agents with LangChain and LangGraph: Part 1 - Core Concepts
Learn the foundational concepts of LLM workflows - connecting language models to tools, handling responses, and building intelligent systems that take real-world actions.
Stay updated
Get notified when I publish new articles on data and AI, private equity, technology, and more.